In this post I’ll show you how you can add multiple post-specific block areas to a single template in a block theme. I’ll explain when you may want to do this as well as the technical reasons why it needs to be done a certain way.
Edit: I added the above video after the original post was made to help further showcase it’s functionality and explain how it works in practice. The original post content is also displayed below.
To start, let’s go over how WordPress stores blocks for a post now.
Every WordPress database has a wp_posts table. The prefix (wp) might be slightly different per install, but there’s always a posts table. This is where every post, page, and custom post type is stored and it includes content such as the post title, URL, modified date, and the post_content (among other things).

The post_content includes all of the blocks for a given post. These are stored using some HTML comments for parsing, which you can see when you go to the “Code Editor” in the block editor itself:

So here you can see the <!-- wp:paragraph --> comments and such around each block. WordPress stores your block’s markup and it’s attributes in this way and then parses them out to display on the frontend. Any blocks you add in the editor will be placed here and subsequently saved to the post_content column in the row for the post you’re editing.
WordPress itself doesn’t come with a way to save blocks anywhere else besides post_content. And most of the time that’s just fine. But there are a few real-world use cases where this would be a limiting factor.
A quick example
Let me paint you a quick picture:
Your client has this fantastic new design for their blog articles, which includes a sidebar. Most of the sidebar content is the same on all blog articles. However, they also want to add a section in the sidebar for post-specific blocks in addition to the main article content. How would you do this?
In the past, the answer would’ve probably involved using post meta to determine what that content is, and the options for editing it would be very simplistic or non-existent. For instance, if someone wanted to show a YouTube video along with some text or a static image, you’d have to build separate controls for each of those things and you’d probably store them in separate meta keys as well.
If they needed to add anything beyond those three things, you’d have to add more custom controls and more meta.
Overall, it would be complicated and not exactly user friendly. Additionally, it would be hard to make it truly extensible and support adding new things beyond what you initially set up. Depending on the available time (and budget) you might even tell the client: this can’t be done.
I actually ran into this exact problem on a WordPress VIP project for a large news website that receives millions of hits per month. They were redesigning their site and they added a new post type that was designed to have 2 sets of dynamic content areas, one of which was to display a timeline of events and the other was just general content of any sort.
So it got me thinking: what would it take to just have a second content area (or outlet) on the page so we could add different sets of blocks to the 2 parts of the template?
How it would need to work
Firstly, the post type itself would need to show the current page template. This part is really easy as there is an option to do this inside the block editor itself that will show you the post’s blocks rendered inside the template along with the template-specific blocks. You can find this option in the right sidebar in Post Settings (Post will just be whatever post type you’re editing) when you click the “Template” option.
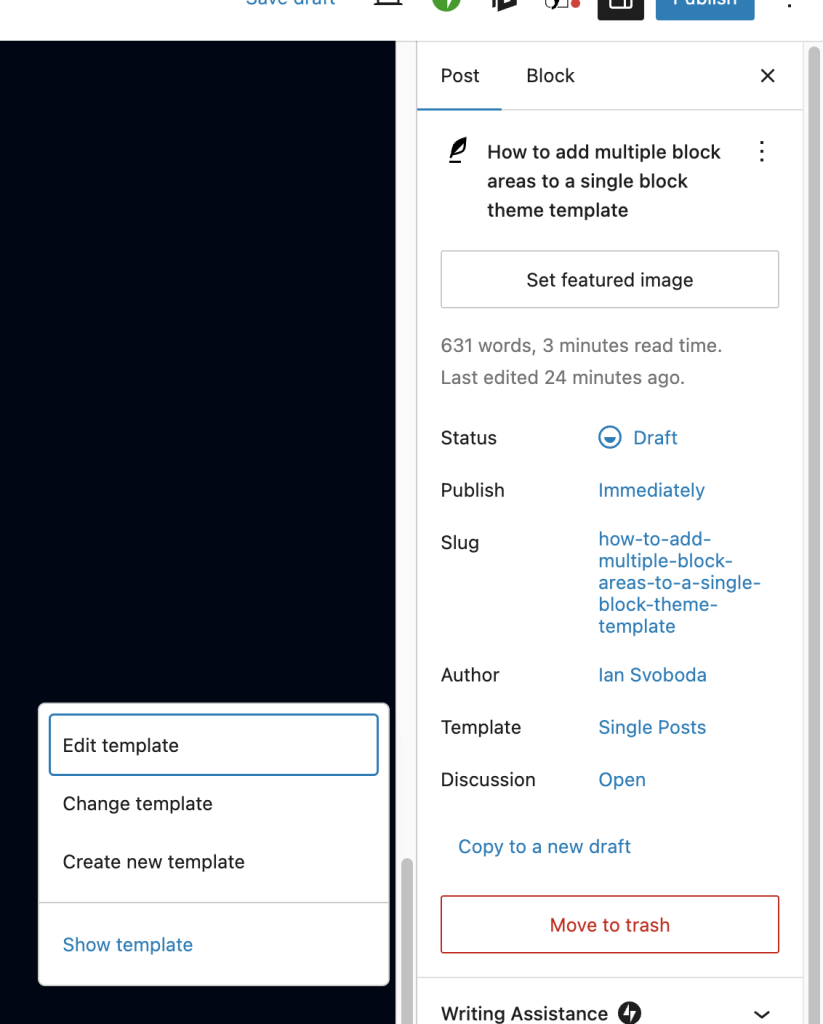
Once you click “Show template” you’ll see the entire template, not just the post_content. This is important because WordPress is only set up to show you the post-specific post content when you’re editing a post.
Now that you can see the template, you need to be able to have a specific block or set of blocks that are marked as “Content Editable”, which allows the block editor to let you edit their content. This is accomplished by adding the block(s) to a list of “post content blocks” by using the filter: editor.postContentBlockTypes.
After all of that, you still need some way to save the blocks to the post and not the template, since these blocks are supposed to be post-specific. And to do that, you’d need to create your own version of the useEntityBlockEditor hook, which is a function that provides getters and setters for storing block content for a given entity (post). This is necessary because (as noted previously) this hook isn’t designed to save block content anywhere other than the post_content.
That’s a whole lot of work and not the type of thing that would be easily accomplished in an afternoon. But thankfully, I did the hard work for you!
The Content Area Block
After struggling with this I finally figured out the solution and then used that as the starting point for my own (free) custom block: the Content Area block! This block makes it super easy to add one or more content areas to your block theme templates and handles all of the complex technical work for you.
On a technical level, this block is effectively a fork of the core/post-content block with a few small added touches to make it user friendly and add some helpful attributes to configure the block.
If you just need one additional content area and don’t have a preference on what the meta key is called, you can use the default one the plugin registers and it’ll work out the box. Alternatively, you can also tell the plugin not to register a meta key for you using a simple PHP filter and then provide your own key to use instead.
Additionally, you can restrict which blocks are able to be added to the content area either by inclusion or exclusion. So you could limit it to a few specific blocks or let users add whatever they want, it’s up to you!
To get this setup, you just need to install the plugin from the WordPress plugin directory either by downloading it then adding it to your site, or you can browse for available plugins and add it directly.
Once the plugin is installed, you just need to add the block to one of your templates and configure it to your liking. You’ll need to specify the meta key (extra_content_area is the one made by default) and then decide what blocks you want to restrict (if any). You can do these by inclusion or exclusion (meaning either only the blocks you specify or any block except the ones you specify).

From there you need to make sure the “Show template” option is enabled for the post type or page you’re editing using that sidebar option I just told you about. Once you do that, you can click on the block in the outline or just click into the place where the block is showing in your template and then start editing blocks as normal.
This plugin makes doing this kind of thing super easy and it supports undo/redo and all the good stuff that makes it client friendly. If you combine this block with some of your own custom blocks, you can create really nice bespoke editing experiences for your clients.
For instance, you might have a series of custom blocks that are all able to be used together and you want to give your client (who isn’t a dev) the ability to easily tweak these. This block makes that possible by allowing you to determine which blocks they can add there and then giving them a visual editing experience just like any other blocks or posts they’re working with.
If you come across a need to do this, I hope this plugin is able to save you a bunch of time and make your client (or whomever you’re building it for) really happy!
You can view the code for the plugin on GitHub if you want to see how it works or contribute new features to it as well. Any contributions are always appreciated!